How we incrementally ship features in LeanIX VSM
In this article, we explain how we use LaunchDarkly in LeanIX Value Stream Management (VSM) to control the availability of new features for our customers.
One of the significant advantages when building a new product like LeanIX Value Stream Management (VSM) is the ease of introducing state-of-the-art technologies. Building new features incrementally and shipping those increments daily is part of our routine. By integrating LaunchDarkly, a tool for managing feature toggles, we were able to take full control over our feature management.
Terminology
Before getting into our LaunchDarkly setup, let's clarify both terms "feature management" and "feature experimentation".
Feature management
In the traditional feature delivery ("build-test-launch model"), features are released to all users at the same time. However, this approach can lead to several issues:
- If the feature contains a severe bug, many users will likely be affected. This could create a bad user experience and in severe cases even put the company's reputation at risk.
- The engineering team is not able to deploy increments to production systems if the feature is still incomplete and missing essential functionality ("all or nothing").
- There is no way to get user feedback at an early stage which can be incredibly important in a feature's further development.
In the modern approach of feature management, engineering teams continuously ship increments to production systems, regardless of the state of the feature. Engineering and product teams can control the availability of a feature in a fine-grained manner using dedicated feature management tools.
Feature experimentation
Engineering organizations use feature experimentation to determine which version works best for their customers by releasing different versions of a feature to different users. Moreover, it includes launching a feature only to a specific target group of users.
Integration into LeanIX VSM
In the following section, we will explain how LaunchDarkly supports us in doing feature management and feature experimentation in LeanIX VSM. Moreover, we will describe how we integrated LaunchDarkly into our application.
Managing feature flags in LaunchDarkly
In the user interface of LaunchDarkly, we can create a feature flag and adjust its settings:
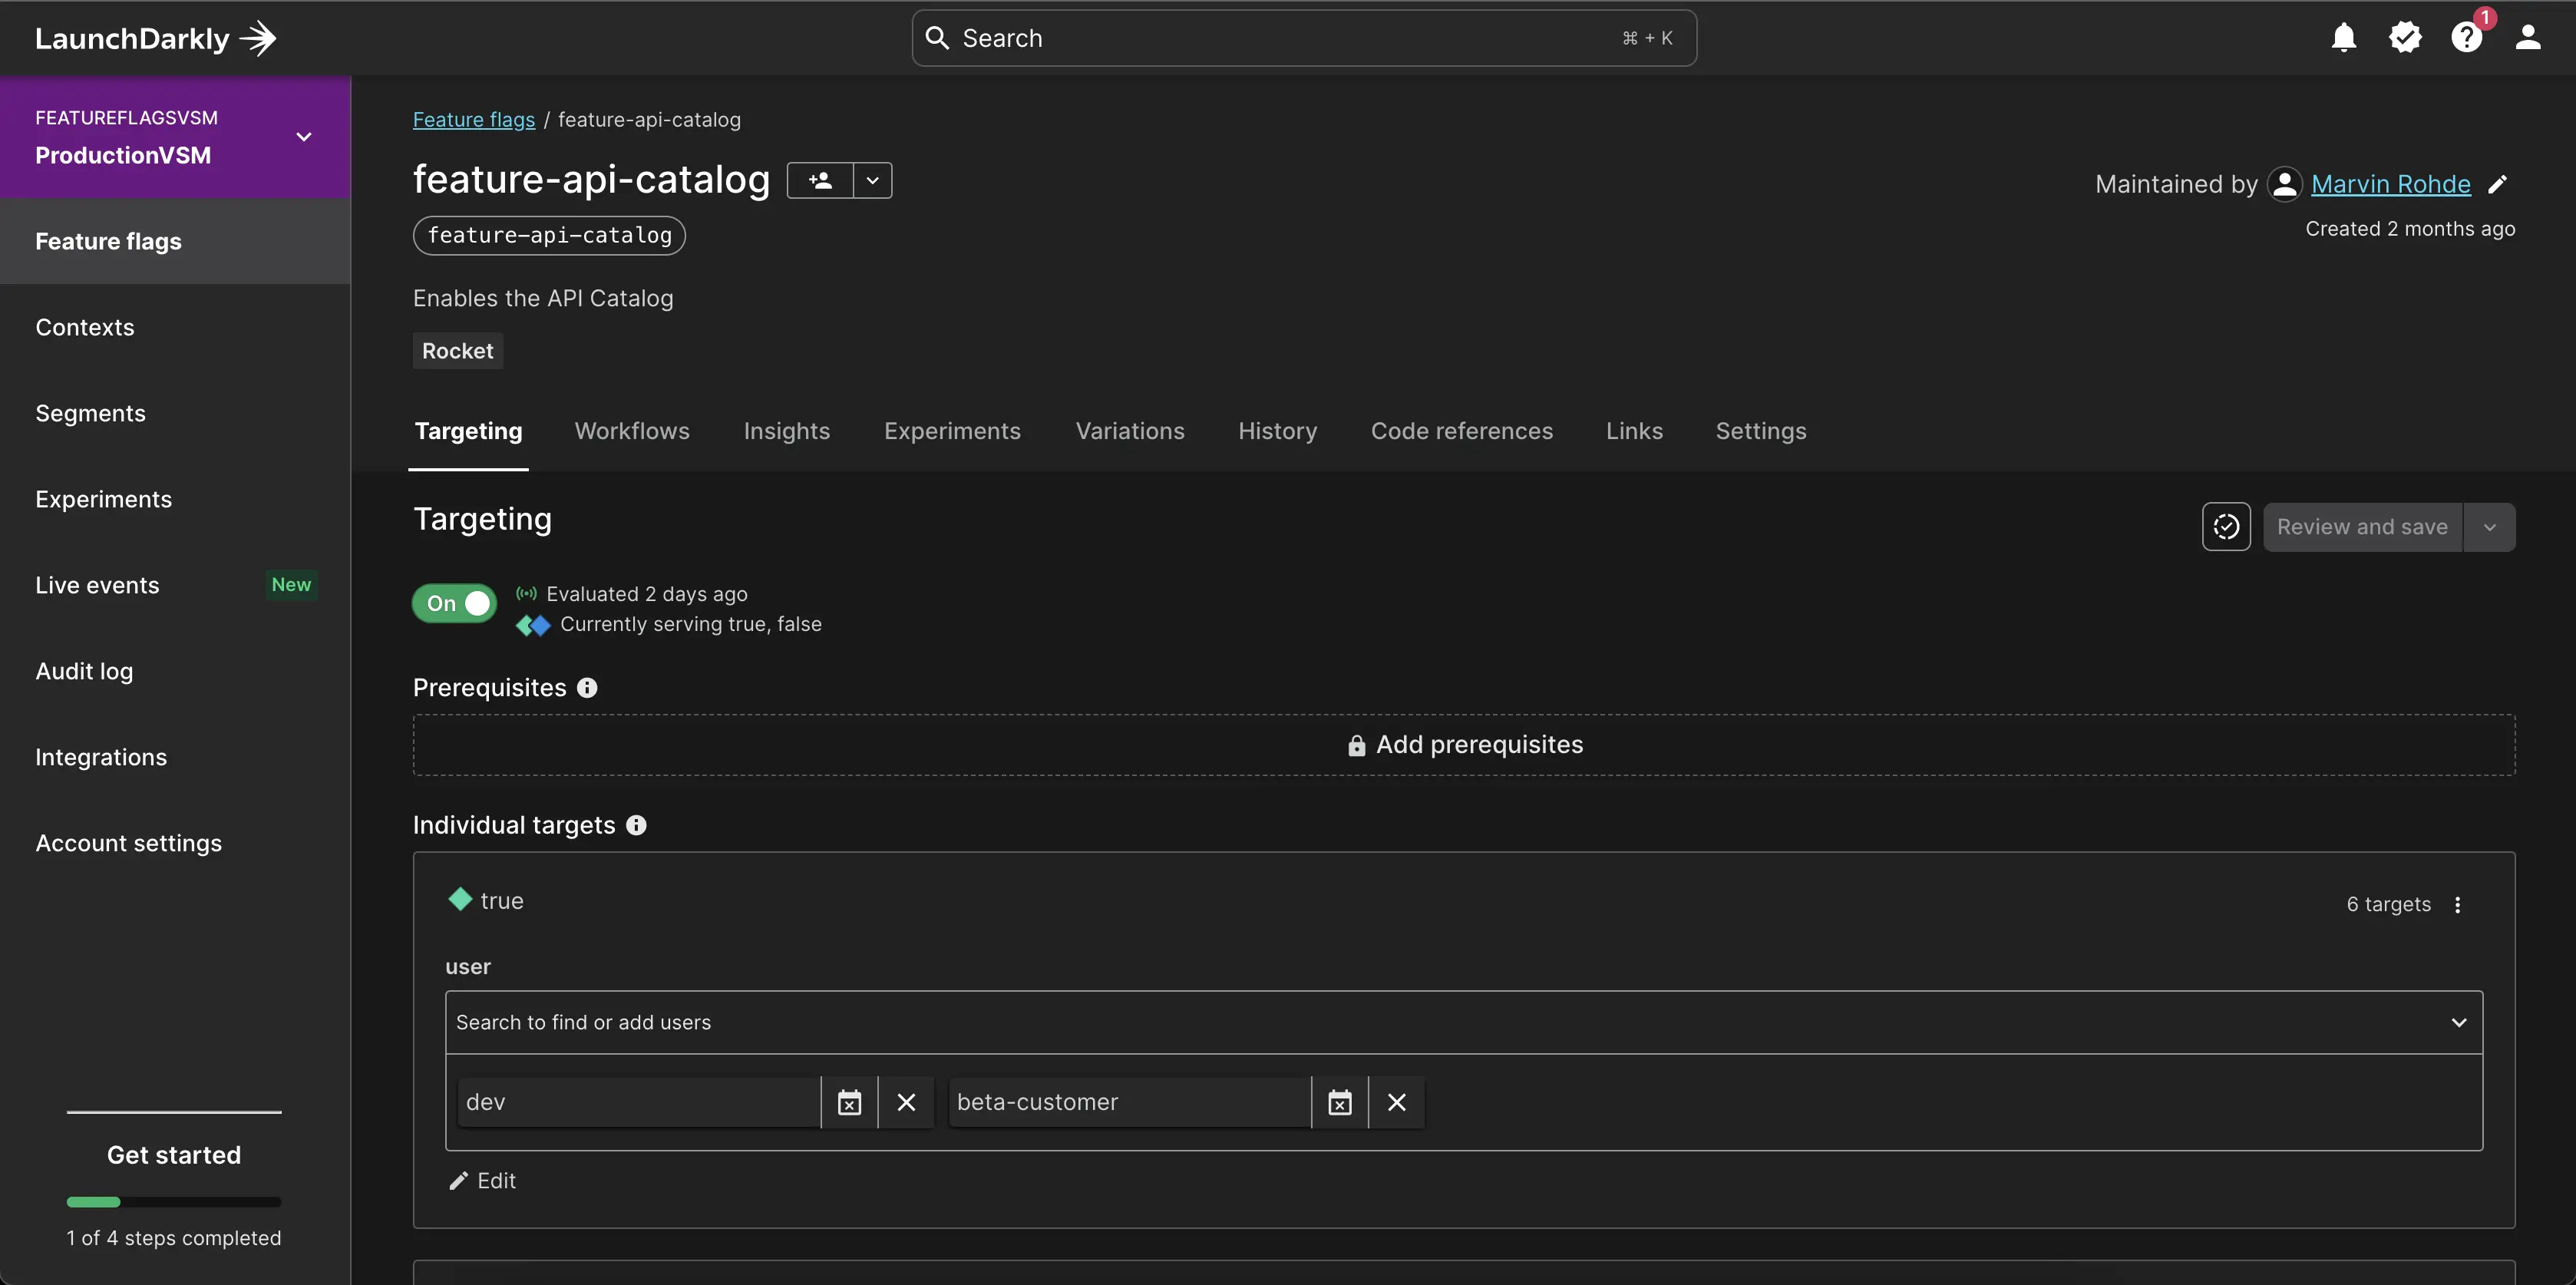
Here you can see that the feature flag feature-api-catalog is enabled and has individual targets: the dev workspace used by developers for local development and the beta-customer to grant early access to one of our customers. A LeanIX workspace is a customer-specific application context and can only be accessed by users who are part of the customer's organization. We manage feature flags per LeanIX workspace and treat them as users in the context of LaunchDarkly. Therefore you can see the names of workspaces here instead of actual user names.
Apart from the user name, we're able to target users based on other parameters, such as the region of a workspace (e.g. Europe).
You might wonder how we make workspace-specific data show up in LaunchDarkly. We will explain this in the next section.
Setting up the LaunchDarkly Client SDK
To use LaunchDarkly in our application, let's install the LaunchDarkly Client SDK:
npm i launchdarkly-js-client-sdkNow we can initialize the LaunchDarkly client during application bootstrap according to the documentation:
import { initialize } from 'launchdarkly-js-client-sdk';

const clientId = '12345'
const region = detectRegion();

async initialize(workspace: Workspace): Promise<void> {
  const instanceUrl = workspace.instance.url;
  const client = initialize(clientId, {
    key: workspace.id,
    name: workspace.name,
    custom: { region, instanceUrl }
  });
  await client.waitForInitialization();
}
The initialize function allows passing several parameters:
clientId: the id of our LaunchDarkly environment. We can retrieve this id from the user interface of LaunchDarkly after creating the environment.user: theLDUserobject. LaunchDarkly identifies every user by an id and a name. Here we use the workspace id and workspace name to let LaunchDarkly treat the current workspace as a LaunchDarkly user. Additionally, we pass the workspace region and instance URL as custom parameters. We can use this data for targeting rules of a feature flag and will see them in the user details area of LaunchDarkly.
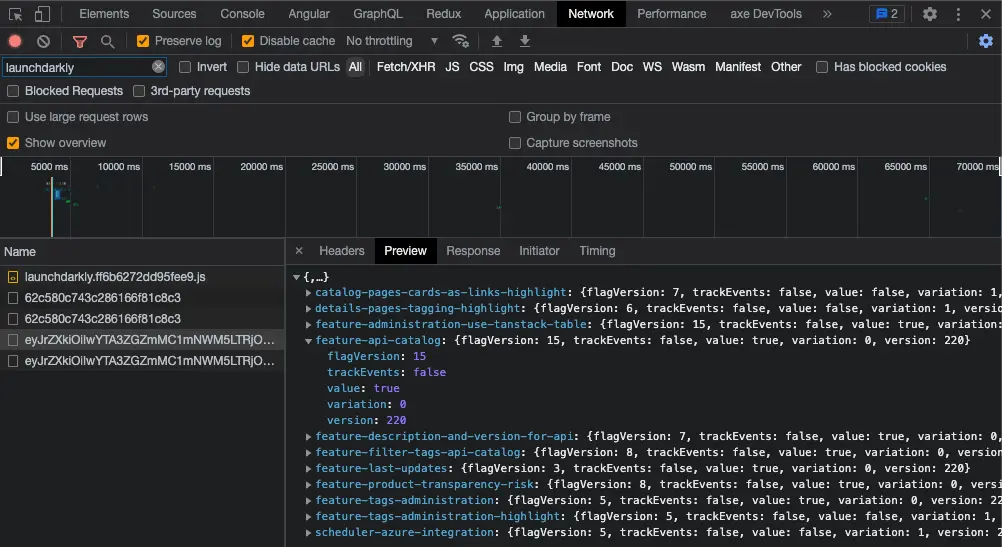
By calling this function, the LaunchDarkly client will fetch all relevant information about the feature flags we've created in our environment. Based on the specified rules, LaunchDarkly evaluates whether a flag is enabled and indicates the result in the value property of the response:
Using the SDK in our application
Now that we've set up the LaunchDarkly client we're ready to use it. In this example, we use an InjectionToken that can be used in the whole application:
import { InjectionToken, Provider } from '@angular/core';

export interface FeatureChecker {
  isFeatureEnabled(featureId: string): boolean;
}

export const FEATURE_CHECKER = new InjectionToken<FeatureChecker>('Feature checker');
We've created the LaunchDarklyService as a wrapper for the LaunchDarkly client. To check feature availability, we can call the client's variation method, providing the feature key and a fallback value:
@Injectable({ providedIn: 'root' })
export class LaunchDarklyService {
  [...]
  isFeatureEnabled(featureKey: string): boolean {
    return this.client.variation(featureKey, false);
  }
}
Let's define a provider for this token with a simple implementation and add it to the providers array of our AppModule:
[...]
providers: [
  {
    provide: FEATURE_CHECKER,
    useFactory: (launchDarklyService: LaunchDarklyService) => ({
      isFeatureEnabled: (featureKey: string) => {
        return launchDarklyService.isFeatureEnabled(featureKey);
      }
    }),
    deps: [LaunchDarklyService]
  }
]
This allows us to check if a feature is enabled from anywhere in the application.
We've identified two scenarios in our application when we need to check feature availability: when rendering the feature as an HTML element on a page or directly accessing it via URL.
Conditionally rendering a feature
To conditionally show a feature on a page, we use the built-in Angular ngIf directive in combination with our custom vsmFeatureEnabled pipe. This pipe uses the FEATURE_CHECKER token to check if the given feature is enabled and returns a boolean. The ngIf directive takes care of showing or hiding the element based on the result:
<section *ngIf="'feature-tech-radar' | vsmFeatureEnabled">
  <!-- feature content goes here -->
</section>
In some cases, it might still be required to perform this check in our TypeScript code. Therefore we can simply use the injection token mentioned beforehand:
import { FEATURE_CHECKER } from './utils/feature-checker.ts';
[...]
private readonly featureChecker = inject(FEATURE_CHECKER);

ngOnInit(): void {
  if (this.featureChecker.isFeatureEnabled('feature-tech-radar')) {
    this.openSidePanel();
  }
}
Conditionally restricting access to a feature URL
Our users can access many features of LeanIX VSM via URL. To restrict URL access, we can tweak the route configuration by adding conditions to the canMatch option. The underlying code of a lazy-loaded component or module will only be loaded if all specified conditions are fulfilled. Based on those conditions, we could even load different modules or components for the same URL.
Example: if the "alpha" feature flag is enabled and the user navigates to the "/apis" route, the browser will fetch the code chunk of the FeatureApiCatalogPageModule. If the "beta" flag is enabled, it will instead load the FeatureApiCatalogComponent.
import { provideRoutes } from '@angular/router';
import { FEATURE_CHECKER } from './utils/feature-checker.ts';

provideRoutes([
  {
    path: 'apis',
    canMatch: [() => inject(FEATURE_CHECKER).isFeatureEnabled('feature-api-catalog-alpha')],
    loadChildren: () => import('@valuestreams-ui/feature-api-catalog-page-alpha').then((m) => m.FeatureApiCatalogPageModule)
  },
  {
    path: 'apis',
    canMatch: [() => inject(FEATURE_CHECKER).isFeatureEnabled('feature-api-catalog-beta')],
    loadComponent: () => import('@valuestreams-ui/feature-api-catalog-page-beta').then((m) => m.FeatureApiCatalogComponent)
  }
]);
This approach allows us to do feature experimentation not only with features that are rendered within a page but also with features that are accessed via URL.
Considerations
If you're wondering whether you should introduce a feature management tool like LaunchDarkly for your application, here are some considerations you might want to take into account:
- Application and organization size: in a small organization such as LeanIX VSM, it's easy to introduce a feature management tool. However, introducing a feature management tool for a more mature application with a bigger underlying engineering organization can be time-consuming and costly.
- Code structure: conditionally showing a feature on a page might be straightforward, but adding many of those conditions to your business logic can make your code hard to maintain. To address the above-mentioned example of feature experimentation, you could create separate feature states when using a state management tool like NgRx.
- Need for fine-grained feature control: if your organization is already using a feature management tool which is working well and you don't see any limitations, there's likely no need to migrate. However, introducing a new feature management tool could give your organization even more control, thanks to powerful feature targeting rules. If you're not using a feature management tool yet and feel unsure whether your organization could benefit from it, you can try it out within a small team for a specific project to gauge if it's worth the effort.
- Feature management process: based on our experience, it is important to define a set of rules and a process within the organization to use such a tool effectively. Such rules could define who actively maintains feature flags or who is empowered to enable them for selected customers. In small engineering organizations this could be done easily. However, in large organizations this could require more effort.
Conclusion
By introducing LaunchDarkly with the setup described in this blog post, we as developers are empowered to continuously ship feature increments to production systems. We can be sure that our customers won't run into issues by trying out a feature in an unfinished state as we're hiding everything which is in development state behind feature flags. Product managers can easily release features to all customers or grant early access to selected customers by enabling the corresponding feature flags.
We've gained full control over our feature management with LaunchDarkly in a lean way. Since we're still learning from the implications of doing feature management with our current setup, feature experimentation is a topic worth looking into as a next step.
References
1. See "What is feature management and feature experimentation?" ↑
2. See "What is feature testing?" ↑
3. In the following example, it is assumed that a LaunchDarkly environment has already been set up. You can read more about LaunchDarkly environments in the documentation.↑
4. In this example, it is assumed that both features are exclusive and cannot be enabled at the same time.↑
Published by...

Marvin Rohde
Visit author page