Handsontable - what you won't find in the docs
Handsontable is a JavaScript data grid framework which we at SAP LeanIX use to build table experiences. Learn what challenges you might run into when implementing advanced usage scenarios with Handsontable and how you can tackle them.
Table of contents
- Introduction
- Change validation
- Implementing cell renderers
- Implementing a custom editor
- Custom validators
- Conclusion
Introduction
This blog post serves as a guide for developers who are already familiar with Handsontable's core functionality and are using it to build complex table experiences. While building a new table experience with Handsontable for SAP LeanIX Architecture and Road Map Planning, we have discovered significant peculiarities of this framework. Unfortunately, many of those are either poorly documented or not documented at all on the Handsontable documentation page. We provide Angular-specific examples, though the underlying concepts are framework-agnostic. Note that this post refers to the latest version of Handsontable when this post was written, which is 14.3.0.
Change validation
TL;DR: Don't use objects if you are building a custom editor and want to store non-primitive values. Consider using arrays or string representations instead.
You need to consider Handsontable's internal change validation as soon as you build a custom editor. Handsontable validates changes every time a user updates a cell's value. This happens in the following scenarios:
- The user edits cell contents and closes the editor by selecting another cell.
- The user pastes data into a cell.
- The user uses the built-in autofill feature by dragging the bottom-right handle of a cell to change the content of several cells at once.
When a cell value updates, the framework calls the populateFromArray function, which validates the cell value changes. This change validation is crucial, as Handsontable does not apply the value if the change validation fails. You can find the function's implementation here.
Value comparison
When you use primitive values, change validation is very permissive: you can change any cell value of type string or number to any value of type string or number. We will dive deeper into change validation of complex cell values in the "Schema checks" section.
The following table summarizes which type combinations will pass or fail populateFromArray's change validation. Be aware that Handsontable will close the editor without applying the value to the cell when change validation fails.
Schema checks for object & array values
The populateFromArray function generates a schema for both the previous and new values and compares them when you use objects or arrays a cell values.
duckSchema function
For both the previous and new values, Handsontable creates a schema with the duckSchema function. Based on the provided value, it creates an object representing its structure in the following manner:
- It replaces primitive values with
null. - It replaces array values with
[]. - It calls
duckSchemafor object properties to generate their schemas recursively.
For example, the result of
duckSchema({ prop1: 'test', prop2: { childProp1: 5 }, prop3: [] })will be
{ "prop1": null, "prop2": { "childProp1": null }, "prop3": [] }You can find the implementation of the duckSchema function here.
Object schema comparison
After generating both schemas, Handsontable compares them in this way:
JSON.stringify(schema1) === JSON.stringify(schema2)This comparison has significant implications:
- The new value object must have the same properties as the previous value object.
- All property types of the new value must match the previous value's property types, deeply.
- Previous property order must deeply equal the new value.
You can find the implementation of the schema comparison here.
Taken as a whole, using objects as cell values is not recommendable for the following reasons:
- If the schema checks fail, Handsontable will not update the cell's value, even if the
valueproperty of the editor was properly updated. Handsontable does not log any errors to the console in this case, which makes troubleshooting difficult. - Due to the schema comparison, using additional or optional properties is not possible.
- You will need to debug Handsontable's code to find out why the schema validation fails.
- The implications of using object values are not mentioned in Handsontable's documentation.
Alternative value conversion approaches
We suggest two alternative approaches to using objects as cell values: converting values into arrays or string representations. For both approaches you need to convert the values before passing them to your custom renderer or editor. To support copying and pasting, you will also need to manipulate values in the beforeCopy and beforePaste hooks. The below code samples show examples of value conversion in a custom editor implementation.
Wrapping the object in an array
A simple alternative to using object values is wrapping the object value in an array:
override open(): void {
  // unwrap the value
  const value = this.value[0];
  // clone the value to avoid mutability issues
  this.element.value = structuredClone(value);
}

override setValue(newValue?: any): void {
  if (newValue) {
    // wrap the value again
    this.value = [newValue];
  }
}
Using stringified JSON objects
Another alternative is converting the object into a string:
override open(): void {
  try {
    // parse the value to use it in the editor
    this.TD.value = JSON.parse(this.value);
  } catch (error) {
    console.error('custom editor could not parse value', error);
  }
}

override setValue(newValue?: any): void {
  // stringify the value again
  this.value = JSON.stringify(newValue);
}
Convert copied data in the beforeCopy hook
You can use the beforeCopy hook to convert copied values into a more readable format. Note that once a cell value is converted it might not be possible to convert it back into its original format, and thus it cannot be pasted into another cell in the table:
const table = new Handsontable(element, {
  beforeCopy: (data, coords) => {
    for (const pastedRow of data) {
      for (const pastedValue of pastedRow) {
        // Change the copied value here
      }
    }
  }
});
Convert pasted data in the beforePaste hook
To convert values when a user pastes data into the table, you can leverage the beforePaste hook:
const table = new Handsontable(element, {
  beforePaste: (data, coords) => {
    for (const pastedRow of data) {
      for (const pastedValue of pastedRow) {
        // Convert the pasted value here
      }
    }
  }
});
Implementing cell renderers
Cell renderers are a powerful feature of Handsontable, as they allow you to modify the contents of a table cell element. When using a framework like Angular you might want to render Angular components in table cells. In our case, we wanted to use components from our own Angular component library to ensure a consistent user experience. By using Angular components, you can benefit from the framework's features, such as property binding, change detection or managing the component's lifecycle. In this section, we explain how you can bootstrap an Angular component from a cell renderer function.
Angular elements to the rescue
With Angular elements, you can define a web component backed by an actual Angular component. Angular will bootstrap the component as soon as the custom element is added to the DOM and destroy it as soon as the custom element is removed from the DOM.
Registering the Angular component as a custom element
First, you need to register your custom element in the browser's CustomElementRegistry, using the createCustomElement function exported by the @angular/elements package. Make sure to register the custom element before the table is rendered, e.g. when bootstrapping your application:
import { createCustomElement } from '@angular/elements';

// Register the custom element during application bootstrap
{
  provide: APP_INITIALIZER,
  multi: true,
  useFactory: (injector: Injector) => () => {
    const element = createCustomElement(MyCellViewComponent, { injector });
    customElements.define('app-my-cell-view-element', element);
  },
  deps: [Injector]
}
Spinning up the Angular component
We can now bootstrap the Angular component in the cell renderer function:
export function customRenderer(
  instance: Handsontable,
  td: HTMLTableCellElement,
  row: number,
  col: number,
  prop: string,
  value: string | null,
  cellProperties: CellProperties
): HTMLTableCellElement {
  // Call Handsontable's `baseRenderer` to add / remove
  // CSS classes to / from the table cells.
  baseRenderer(instance, td, row, col, prop, value, cellProperties);

  // Clear the old cell contents
  td.innerHTML = '';

  // This adds the Angular element to the DOM and will bootstrap your component
  const element = document.createElement('app-my-cell-view-element') as NgElement & MyCellViewComponent;

  // `value` here is an input of MyCellViewComponent, e.g. `@Input({ required: true }) value: string | null;`
  element.value = value;

  // You can add more inputs here

  // Attach the web component to the table cell element
  td.appendChild(element);

  return td;
}
Performance considerations when using Angular elements
You need to be aware of the performance degradation when using Angular elements as it can amount to 25% if the table renders many cells (1000 or more). Here are results of a speed test, comparing the rendering performance of normal Angular components with Angular elements:
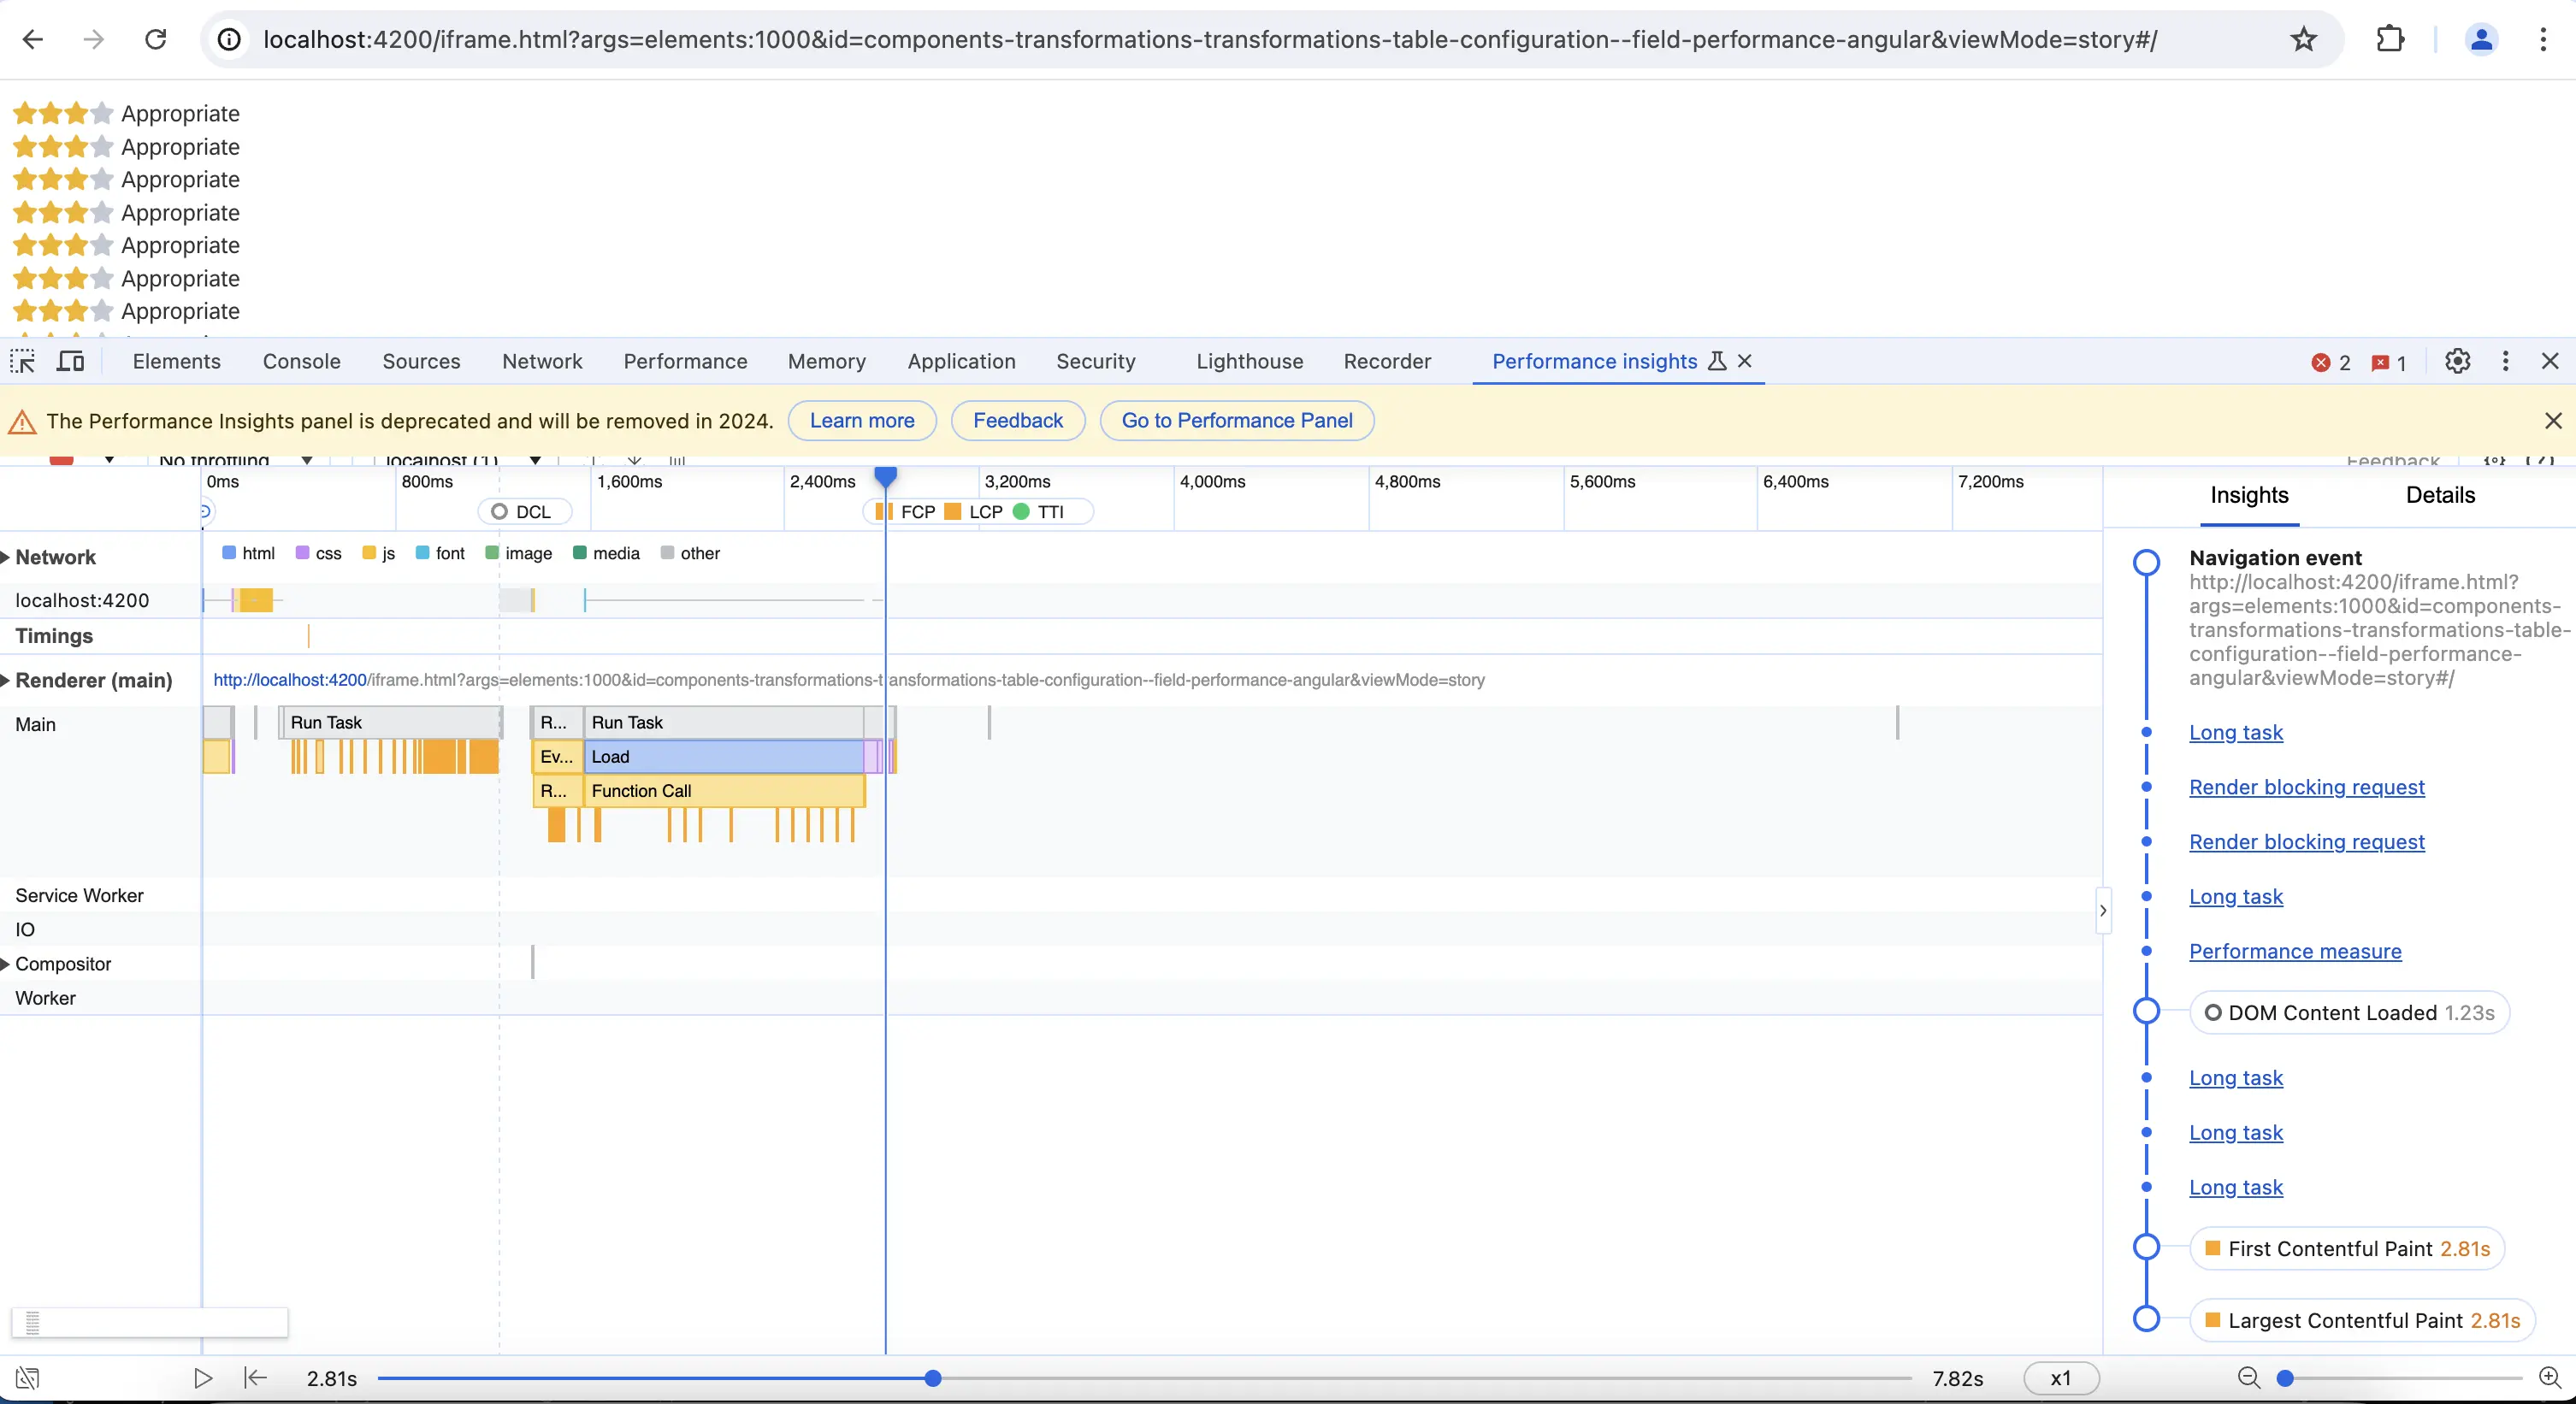
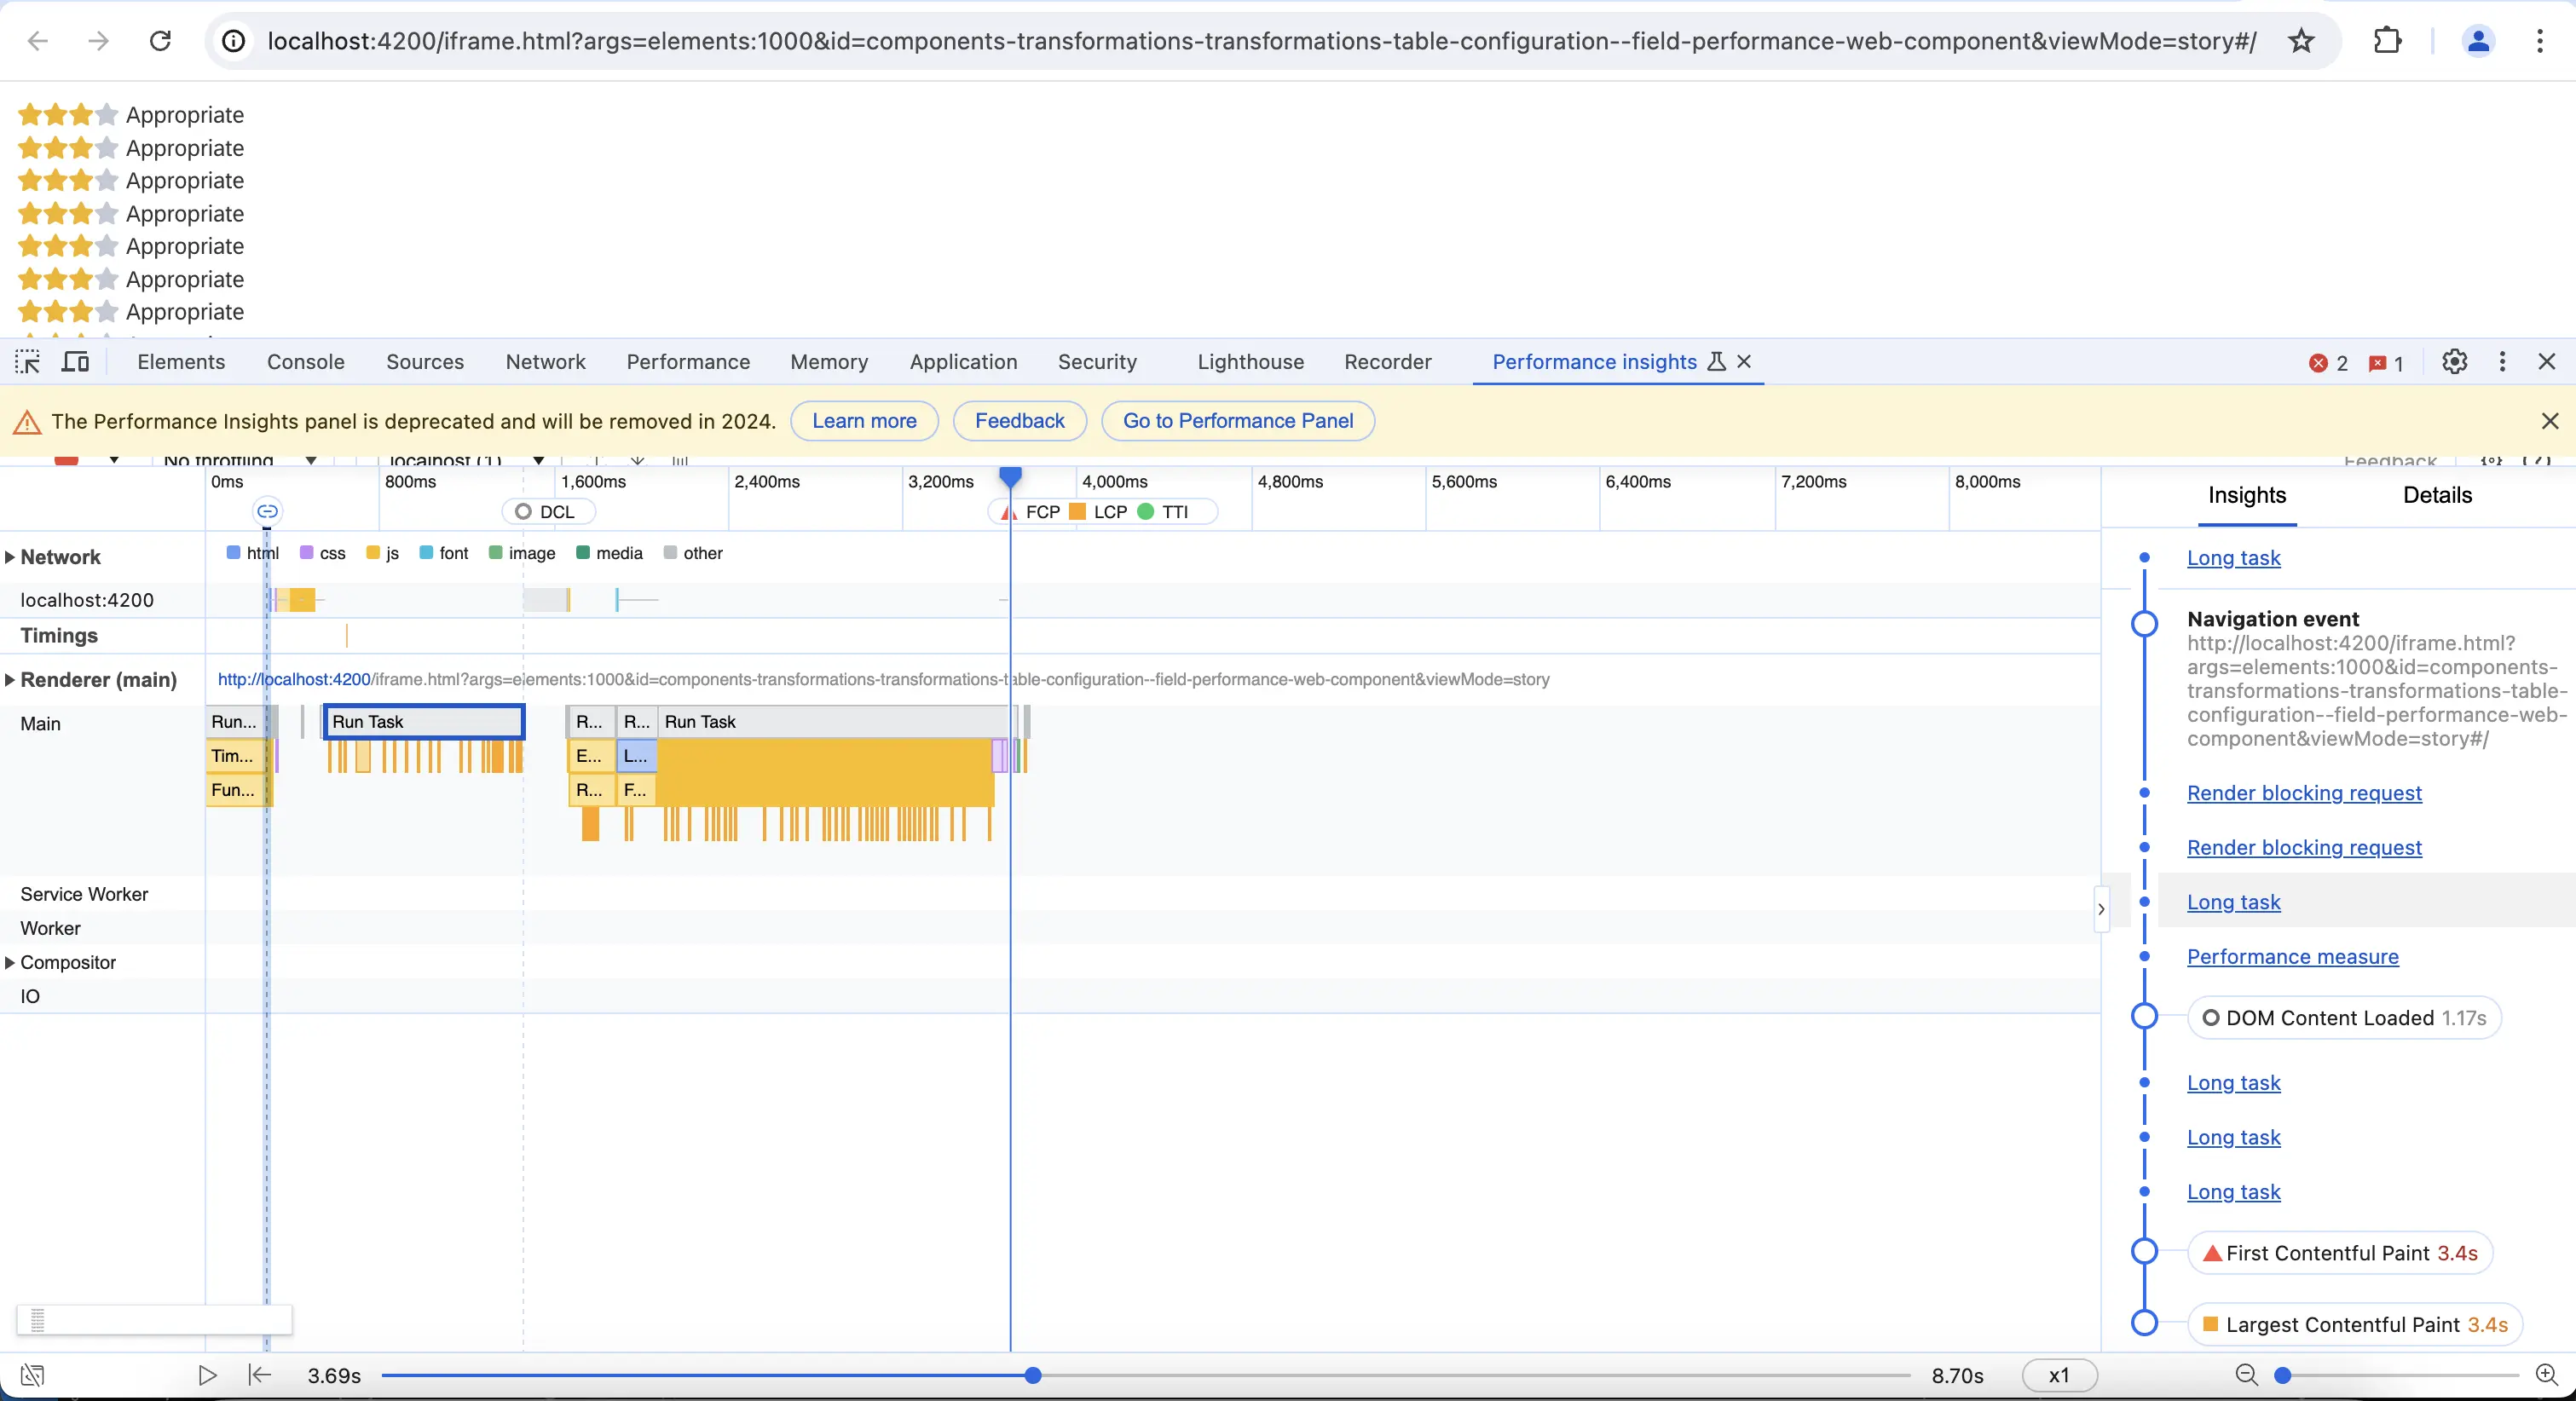
As you can see, rendering Angular components took 2.81 seconds and rendering Angular elements took 3.69 seconds (~25% difference).
To prevent performance degradation it is recommended to use row virtualization which is enabled by default.
Opening the editor from the viewer component
To determine when a cell editor should be opened, Handsontable listens to user interactions such as double-clicks on a cell. However, you might want to provide further options for the user to open the editor. Learn how to open a cell's editor programmatically from the viewer component in this section.
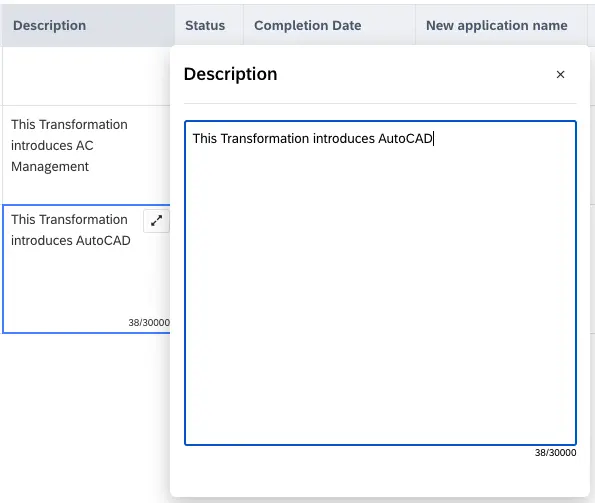
Suppose you have implemented a custom viewer component as described in the previous section. This component is able to display the text content of a cell. Now you want to add another option to open the editor: an expand button which opens a dialog with a larger text input.
To do so, you need to retrieve the instance of your custom editor. The getCellEditor function sounds promising. However, this function returns the cell editor's class, not its instance.
Unfortunately, there is no officially supported method to retrieve the instance of a cell editor. The only option we found is using the undocumented getEditorInstance function. It allows you to retrieve the editor instance by passing the editor class and the table instance:
import { getEditorInstance } from 'handsontable/editors';

export function openCellEditor(value: string, tableInstance: Handsontable, row: number, column: number): void {
  const editor = tableInstance.getCellEditor(row, column);
  // retrieve the editor instance
  const editorInstance = getEditorInstance(editor, tableInstance);

  if (!editorInstance.openFromViewer) {
    throw new Error(`The cell editor at row ${row}, column ${column} is not a custom editor instance`);
  }
  editorInstance.openFromViewer(value);
}
You can then add a openFromViewer method to the custom editor class, which opens the cell editor:
openFromViewer(initialValue: string): void {
  // remember how the editor was opened
  this.isOpenedFromViewerComponent = true;
  // ensure that `BaseEditor` sets the initial value
  this.enableFullEditMode();
  // continue the lifecycle of the base class
  this.beginEditing(initialValue);
}
There are several aspects to consider:
- In your
openmethod, you need to remember whether the editor was opened from the viewer component, as you want to render the editor differently. In this example, theisOpenedFromViewerComponentflag is used for that purpose. - You must call
enableFullEditModeto ensure that the editor's initial value is set. When opening the editor the usual way (via mouse or keyboard), Handsontable'sEditorManagercalls this method. But in this case you need to do it yourself. - Do not call the editor's
openmethod directly. Instead, call thebeginEditingmethod, which comes first in the editor's lifecycle order. If you do call theopenmethod directly, the editor will be opened, but Handsontable will not update the editor'sstateproperty toSTATE_EDITINGwhich will lead to significant issues.
Implementing a custom editor
Cell editors allow you to fully control the editing flow in table cells. A requirement for the table we built was to allow searching for a fact sheet from the SAP LeanIX inventory and selecting it within the cell. This step also requests fact sheet data based on the user input. Since we already had an existing Angular component that supports this, we wanted to build a custom editor, which renders the component and handles communication between the table framework and the component. Similarly to custom renderers, we were able to achieve this by leveraging web components.
Plugging an Angular component into the editor
To render an Angular component for editing cells you should create a custom editor class that extends the BaseEditor class. You need to implement the abstract methods open, close, getValue, setValue and focus. To keep the following code samples simple, we assume that you are using primitive cell values. When dealing with complex cell values you should consider applying value conversions as described in the previous sections.
Registering the custom editor element
You can register the custom editor element similarly to the cell renderer. See the section about cell renderers.
Opening the editor
Implement the open method to bootstrap your component:
- Create the Angular element
- Pass the current cell value to the component. You can make use of the base class members to retrieve the cell's metadata (e.g.
this.cellProperties) to render the component differently, depending on its current state (e.g. validity). - Register an event listener to let Handsontable know about value changes in the editor component. Remember to remove the event listener in the
closemethod. - Clear old cell contents and append the Angular element to the DOM.
private valueChangeListener = (event: CustomEvent<CellValue>) => this.setValue(event.detail)

override open(event?: Event): void {
  // Create the Angular element
  const element = document.createElement('app-my-cell-editor-element') as NgElement & MyCellEditorComponent;

  // Initialize the component's `value` input property.
  element.value = this.value;

  // Register the event listener to notify Handsontable about cell value changes.
  element.addEventListener('valueChange', this.valueChangeListener);

  this.element = element;

  // Clear the cell contents and append it to the DOM
  this.TD.innerHTML = '';
  this.TD.appendChild(element);
}
Closing the editor
In the editor's close method, make sure to clean up event listeners:
override close(): void {
  this.element.removeEventListener('valueChange', this.valueChangeListener);
}
getValue
Your getValue method should return the value property of the BaseEditor instance:
override getValue(): CellValue {
  return this.value;
}
setValue
In the setValue method, update the BaseEditor's value. Be aware that Handsontable calls setValue already before the editor is opened. So if you need to access the element you should check if the editor is opened:
override setValue(newValue?: any): void {
  // Update the internal cell value
  this.value = newValue;

  // Update the component value for two-way data binding
  if (this.element && this.isOpened()) {
    this.element.value = newValue;
  }
}
Important: When setValue is called for the first time after opening the editor, newValue is the initial value, but Handsontable will try to convert it into a string. So newValue will be '[object Object]' if you use an object as a cell value. As a workaround, you can access the initial value via this.originalValue. You can find more details in this GitHub issue: Issue #3510
Handling focus events
Handsontable manages the focus state of table cells. For example, when the user selects a cell in the table via keyboard and presses the enter key, the cell editor will be opened. Since Handsontable does not know your editor component, you need to implement the focus method to ensure your editor component properly reacts to focus events. You can use a ReplaySubject to notify your Angular component:
First, add a ReplaySubject to the editor and implement the focus method:
private readonly focus$ = new ReplaySubject<void>(1);

override focus(): void {
  this.focus$.next();
}
In the Angular component, add a focus input property. Now you can decide how to handle focus events when the component is rendered:
@Input({ required: true }) focus$: Observable<void>;

ngAfterViewInit(): void {
  this.focus$
    .pipe(
      takeUntilDestroyed(this.destroyRef),
      tap(() => {
        // Focus your input element
      })
    )
    .subscribe();
}
In the open method of your editor, pass the focus$ subject to the component:
override open(event?: Event): void {
  // ...
  element.focus$ = this.focus$;
}
Custom validators
After implementing a cell editor that allows selecting fact sheets that are fetched from the backend, we needed to take care of validation. The main challenge we needed to solve was to implement a validator function which validates user input through a network request.
Validator functions with backend requests
Suppose you want to validate if a selected item exists in the backend, and you already have an Angular ItemsService which allows to check if an item exists in your backend.
First you need to pass the service instance to your validator function. You could add a dedicated function which takes care of the validator registration and is called during application bootstrap:
// Set up the validator during bootstrap
{
  provide: APP_INITIALIZER,
  multi: true,
  useFactory: (itemsService: ItemsService) => () => initializeHandsontable(itemsService),
  deps: [ItemsService]
}
Now you can implement the validator function and use the ItemsService to check the cell validity with an HTTP request. Here is a simple exemplary implementation:
import { registerCellType } from 'handsontable/cellTypes';

export function initializeHandsontable(itemsService: ItemsService): void {
  registerCellType('custom-cell-type', {
    type: 'custom-cell-type',
    validator: (value, callback) => {
      itemsService.checkIfItemExists(value)
        .pipe(first())
        .subscribe((response) => {
          if (!response) {
            // Item does not exist, cell is invalid
            callback(false);
            return;
          }
          // Item exists, cell is valid
          callback(true);
          return;
        });
    }
  });
}
Excluding certain user actions from validation
We wanted to skip validation after the cell was updated via our custom editor because the custom editor implicitly validates that the item exists. Still, we wanted to validate cells which are pasted or autofilled.
To ignore certain actions from validation, you can return null in the beforeValidate callback and explicitly handle this case in the validator:
const table = new Handsontable(element, {
  beforeValidate: (value, row, prop, source) => {
    if (source !== 'CopyPaste.paste' && source !== 'Autofill.fill') {
      return null;
    }
    return value;
  },
  validator: (value, callback) => {
    if (value === null) {
      // Copy & paste and autofill will be ignored
      callback(true);
      return;
    }
    // ...
  }
});
Show an error indicator in invalid cells
Additionally, we wanted to give users more context about the validation error so they know how to fix them. To do so, you can add some information about the validation error to the cell's metadata:
import { CellProperties } from 'handsontable/settings';

const table = new Handsontable(element, {
  // By using an object initializer we can access the
  // `this` context which is the current cell's metadata
  validator(value, callback) {
    const cellProperties = this as CellProperties;
    cellProperties.validationErrors = {};

    if (!checkFormat(value)) {
      cellProperties.validationErrors = { invalidFormat: true }
      return;
    }
    // ...
  }
});
Now you can access the information in your cell renderer and pass it to your Angular component:
const table = new Handsontable(element, {
customRenderer: (
instance: Handsontable,
td: HTMLTableCellElement,
row: number,
col: number,
prop: string,
value: string | null,
cellProperties: CellProperties
) => {
td.innerHTML = '';
const element = document.createElement('app-my-cell-view-element') as NgElement & MyCellViewComponent;
element.validationErrors = cellProperties.validationErrors;
element.value = value;
td.appendChild(element);
return td;
}
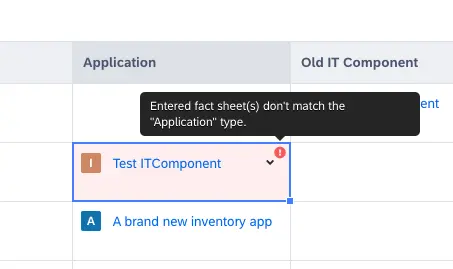
});In the viewer component, we can now show an error icon with a tooltip explaining the error:
Conclusion
Building table experiences with Handsontable is not easy. All basic concepts, be it renderers, validators or editors have their limitations which you can find out by trial and error or by searching through Handsontable's support page and GitHub issues. But you won't find them in the documentation.
This blog post covers the most important findings we made when working with Handsontable. We hope that it will support you building a table experience that makes your users happy. Thank you for reading it.
Footnotes
[1][2]: Although the schema check could never pass for this combination of types, it is still executed. ↑
[3]: The property ordering of JSON.stringify has been standardized in ECMAScript 2020 by implementing the proposal for streamlined for-in enumeration order. ↑
[4]: You can refer to these evergreen GitHub issues to find out more about the schema checks: Issue #3744, Issue #3234.↑
Published by...

Marvin Rohde
Visit author page